- Continue Shopping
- Your Cart is Empty
DIY: Large Cupcake!
Instructions: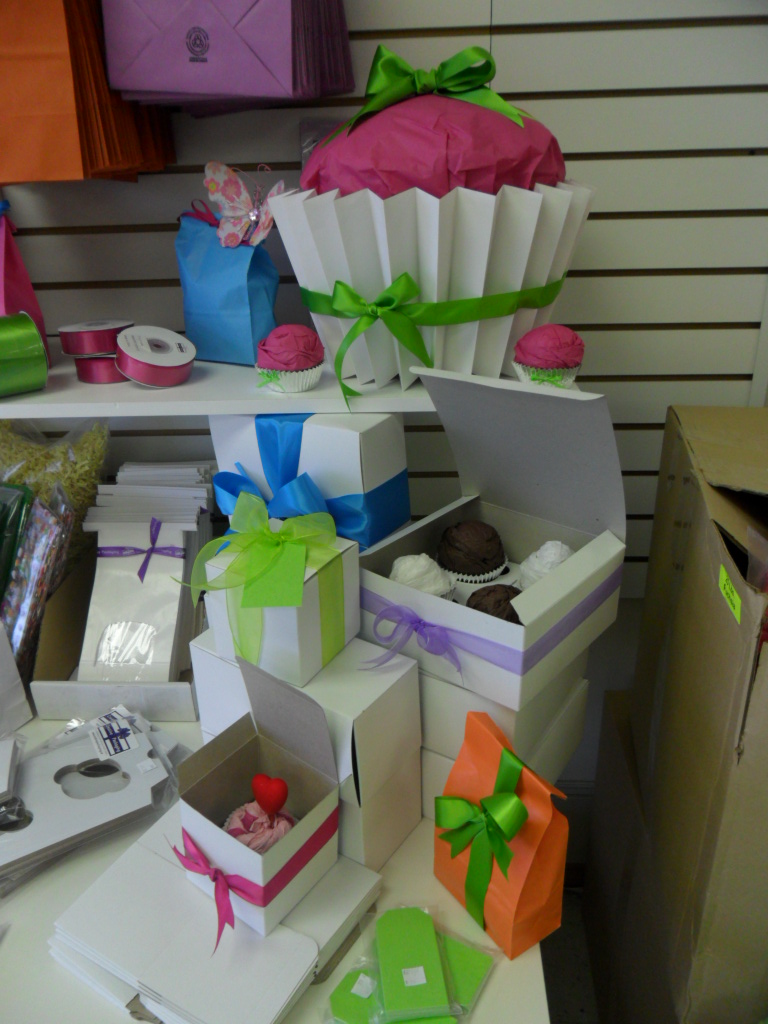
- Cut out two circles. One will be the base. The second one should be about 1 to 2 inches larger in diameter and will be used as the top of the shape. If you think of the shape a cupcake liner would make, you have a section from a cone with a larger circle at the top and the smaller at the bottom.
- Then cut out a whole bunch of strips of cardboard. Anything wider than 1 inch would probably be a pain to work with, so don’t go larger than that. The height of the strip will determine how high your cup will be. We used pieces that were around 5 inches long.
- The strips will be the sides that connect the two round pieces together. This seemed easier when a glob of hot glue was placed on the smaller circle’s edge and then a few strips are placed along the edge at an angle. Remember it will have to go from a smaller diameter to a larger one but don’t be too concerned about getting the angle exact.
- Once the edge of the small circle is covered, take the larger circle and place it inside of the strips. Fiddle around with it to make sure it is fairly center and level in relation to the smaller circle it is suspended above.
- Glue each strip to the second circle. That is your basic shape and will help keep everything together.
- For the outside, use white wrapping paper that will measure out to be about twice the diameter of the larger circle (ex: if the outside rim measures 10 inches all the way around you want to use about 20 inches wrapping paper). It is always a good thing to add a few extra inches just in case.
- Our cupcake liner was made by taking the piece of wrapping paper and folding it three times (along the dotted lines in the little diagram below). This gave an inch of extra paper above the inside cardboard base.
- Take the narrow piece of wrapping paper and fold like a fan. The smaller the distance between the folds the more you will make and the smaller the creases will be on your giant cupcake liner. The larger the distance the less folds but the larger the creases will be.
- When the whole piece of paper is folded open it up and make a circle. Take the cardboard base and make sure it fits inside. Not too loose but you also don’t want it too tight because that will just make it more difficult for you. Trim and glue or tape the two ends of the fan after you have found the fit.
- Place the cardboard base inside the wrapping paper. Make sure the creases are evenly spaced (they won’t just do this on their own unfortunately). Then start gluing the paper to the cardboard so it won’t fall apart if you need to move it.
- The bow on the front of our cupcake does not go all the way around. If you try you’ll notice the shape will force it to an angle. If you have a solution for this other than ours go for it. We simply started in the middle of our cupcake and worked back until the angle of the ribbon was too drastic then made a nice cut. At this point it was far enough back that you can’t tell. You will need to do this twice for each side of the knot.
- The frosting topping was made by using scrap/left over/damaged pieces of wrap film and tissue and then wrapped it with a piece of wrap film. The shape was sculpted at this step with tape so that it had a more domed look. Squish it and pinch it, whatever you can to make it into the shape you think it should be.
- Then cover that shape with the colour you want the icing to be. **Keep checking to make sure this piece fits into the cupcake liner you just built for yourself. If it is too small you can twist some similar coloured tissue to place around the bottom but you can’t easily fix it if it is too large.
- Glue both pieces together and place a cute bow on top.

Leave a comment
Creative Packaging, A113-2099 Lougheed Highway, Port Coquitlam, BC V3B 1A8
© 2026 Creative Packaging (Canada)


X
Creative Packaging
Author