- Continue Shopping
- Your Cart is Empty
Low profile centerpiece – By Glenda @ Edmonton store
![]()
Low profile centerpiece – By Glenda @ Edmonton store


What you will need
- 1- 10x10x21/2 inch Kraft box
- 4- 3x3x3 inch Kraft boxes
- 2 - cups of Kraft shred
- 3 - 12 inch strips of 21/2 inch Gold Satin Ribbon
- 5 - 12 inch, and 4 , 16 inch strips of 1 inch Ivory Satin Ribbon
- 2- 40 inch strips of 1 inch Gold Satin Ribbon
- 8 - 12 inch, 4, 16 inch, and 1, 40 inch, strips of Olive Grosgrain Ribbon
- 1- each decorative picks such as ; Butterfly, Bird, flowers, and Fruit.
- Scissors and Glue stick
What to do
- Evenly space the 2 ½ inch strips of Gold Ribbon on the top of the 10 inch box. Glue in place.
- Follow with the Ivory Satin strips and the Olive Grosgrain.


- Wrap the 2- 40 inch strips of the Gold Satin around the box, gluing in place. Follow with the Olive grosgrain.
- With the 3x3x3 Kraft boxes, fold the side flaps and the lid down into the box.
- Around the outside of the boxes, glue the 1 inch Ivory satin and the Olive Grosgrain
- Lightly pack Kraft Shred into each box.
- Center the 4, 3x3x3 boxes on top of the Ribbon covered 10 inch box.
- Arrange the flowers, fruit, birds and butterflies on top of the 4 boxes.

Here comes the BRIDE EVENT
Thank you for attending our Here Comes the Bride event demonstration.
Remember to check in with our stores often as we are always adding many new products, new colors, and new creative wedding ideas to our web site, stores and social media.
Instructions for the items you have seen today can be printed and /or downloaded from the Creative Packaging blog and website.
Website:
http://www.creativepackaging.ca
Blog:
http://www.creativepackaging.ca/blogs/creative‐crafts
Social Media Links:
Facebook Page:
https://www.facebook.com/creativepackaging
Twitter:
https://twitter.com/creative_pkg
Instagram:
https://instagram.com/creativepackaging
Pinterest:
https://www.pinterest.com/creativepkg/
YouTube:
https://www.youtube.com/user/creativepkg
To make an appointment for a FREE personal Creative consultation please contact:
Edmonton Store: Glenda, edmontonstore@creativepackaging.ca 780-414-0463 / 101-10520-178 st, Edmonton, AB
Burnaby Store: Julie, Jlind@creativepackaging.ca 604-444-3552/ 7964 Winston st, Burnaby, BC.
Calgary Store: Erin, emaclachlan@creativepackaging.ca 403-255-2034/ 6105 Centre st, Calgary , AB
DIY Gifts from the kitchen
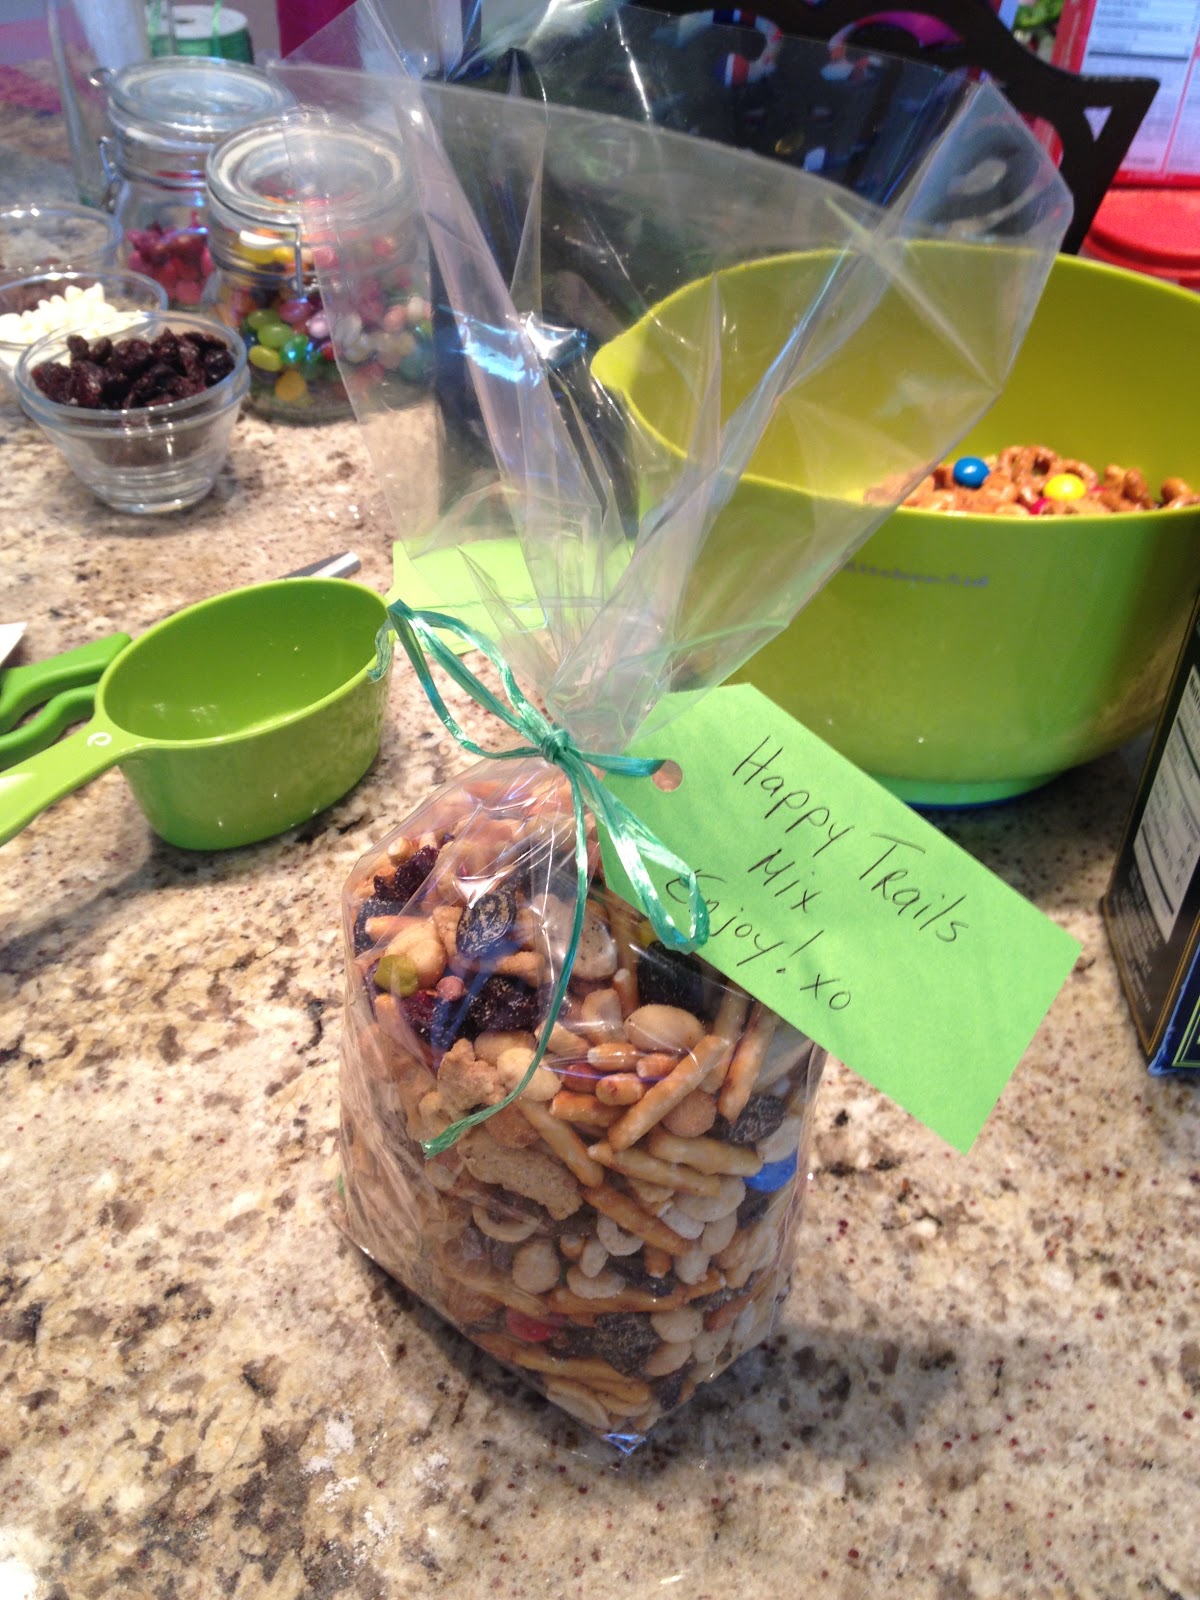
This week is "Just Wrap It" week where we're excited to bring you a taste of the sorts of recipes you'll find in Just Wrap It - D.I.Y. gift mixes from your kitchen. We'll give you directions on how to package the gift mix to give away for the holidays. You'll be giving the gift of a mix from your very own kitchen! So feel free to mix it up and add ingredients you like! All of the packaging you'll need for these gifts can be found at Creative Packaging!Here's our Happy Trails Mix!


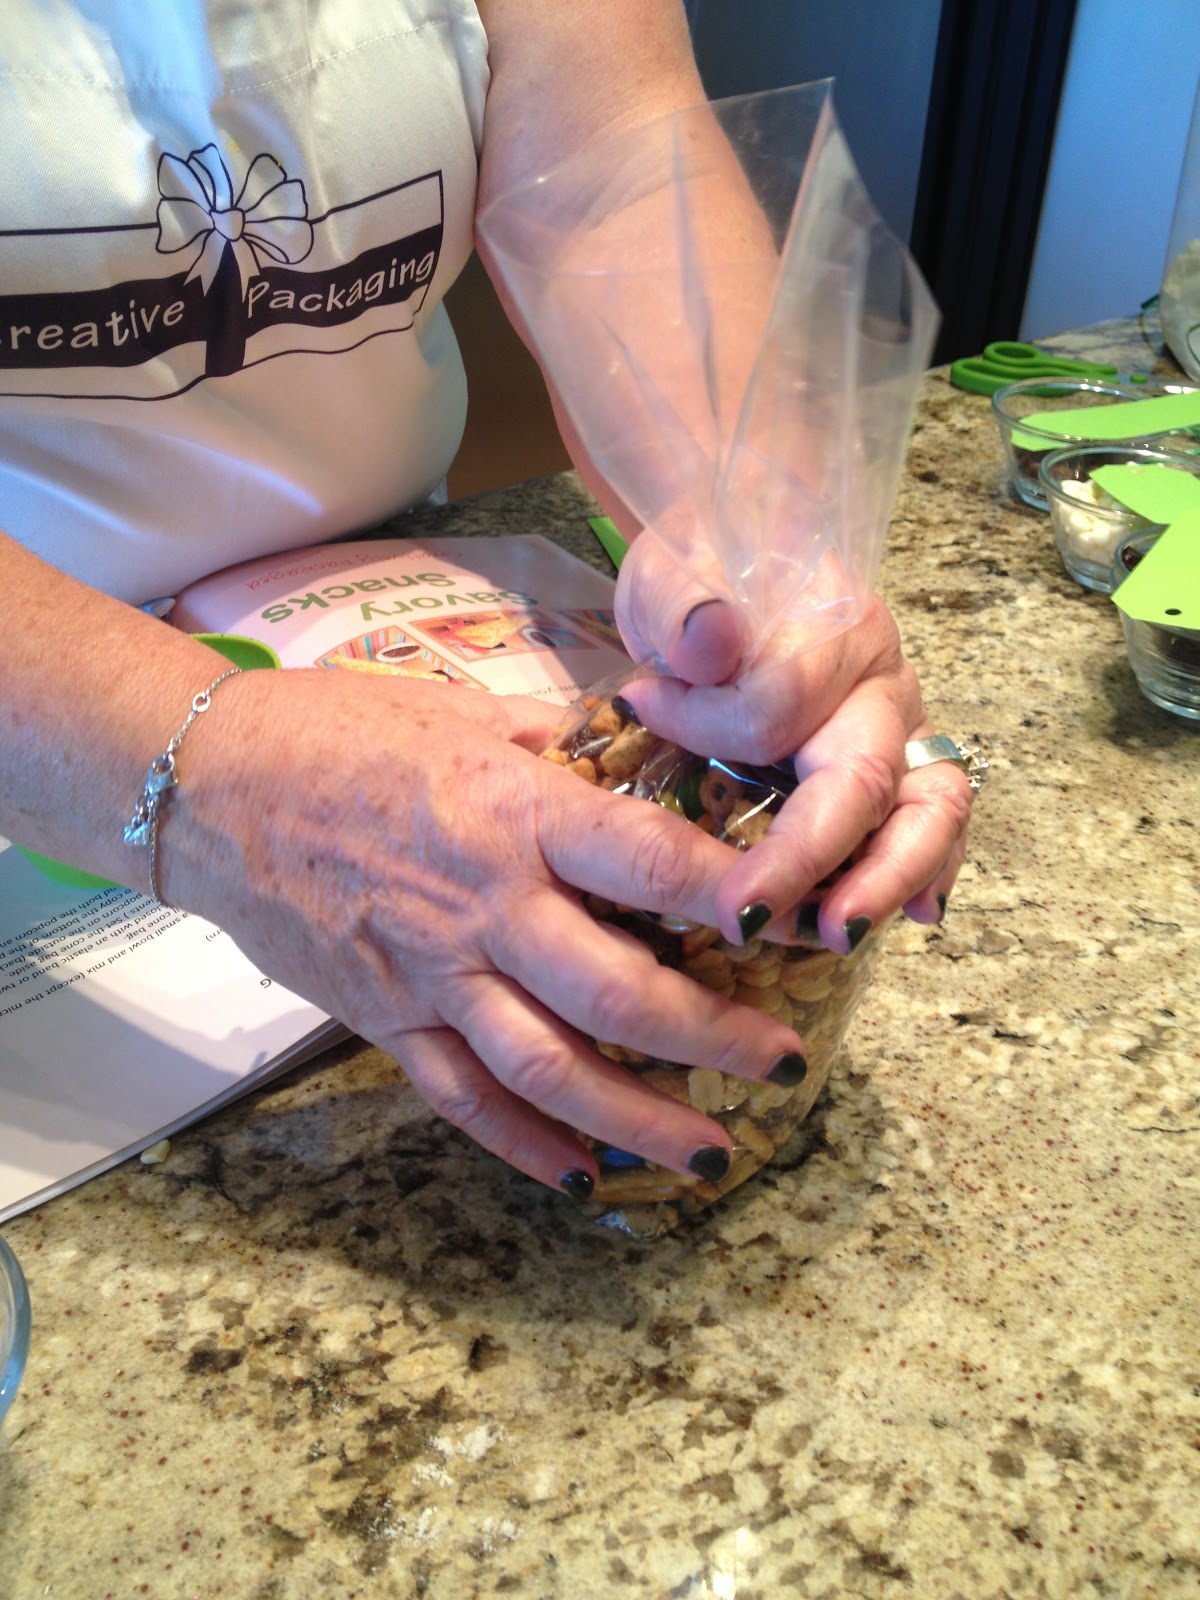

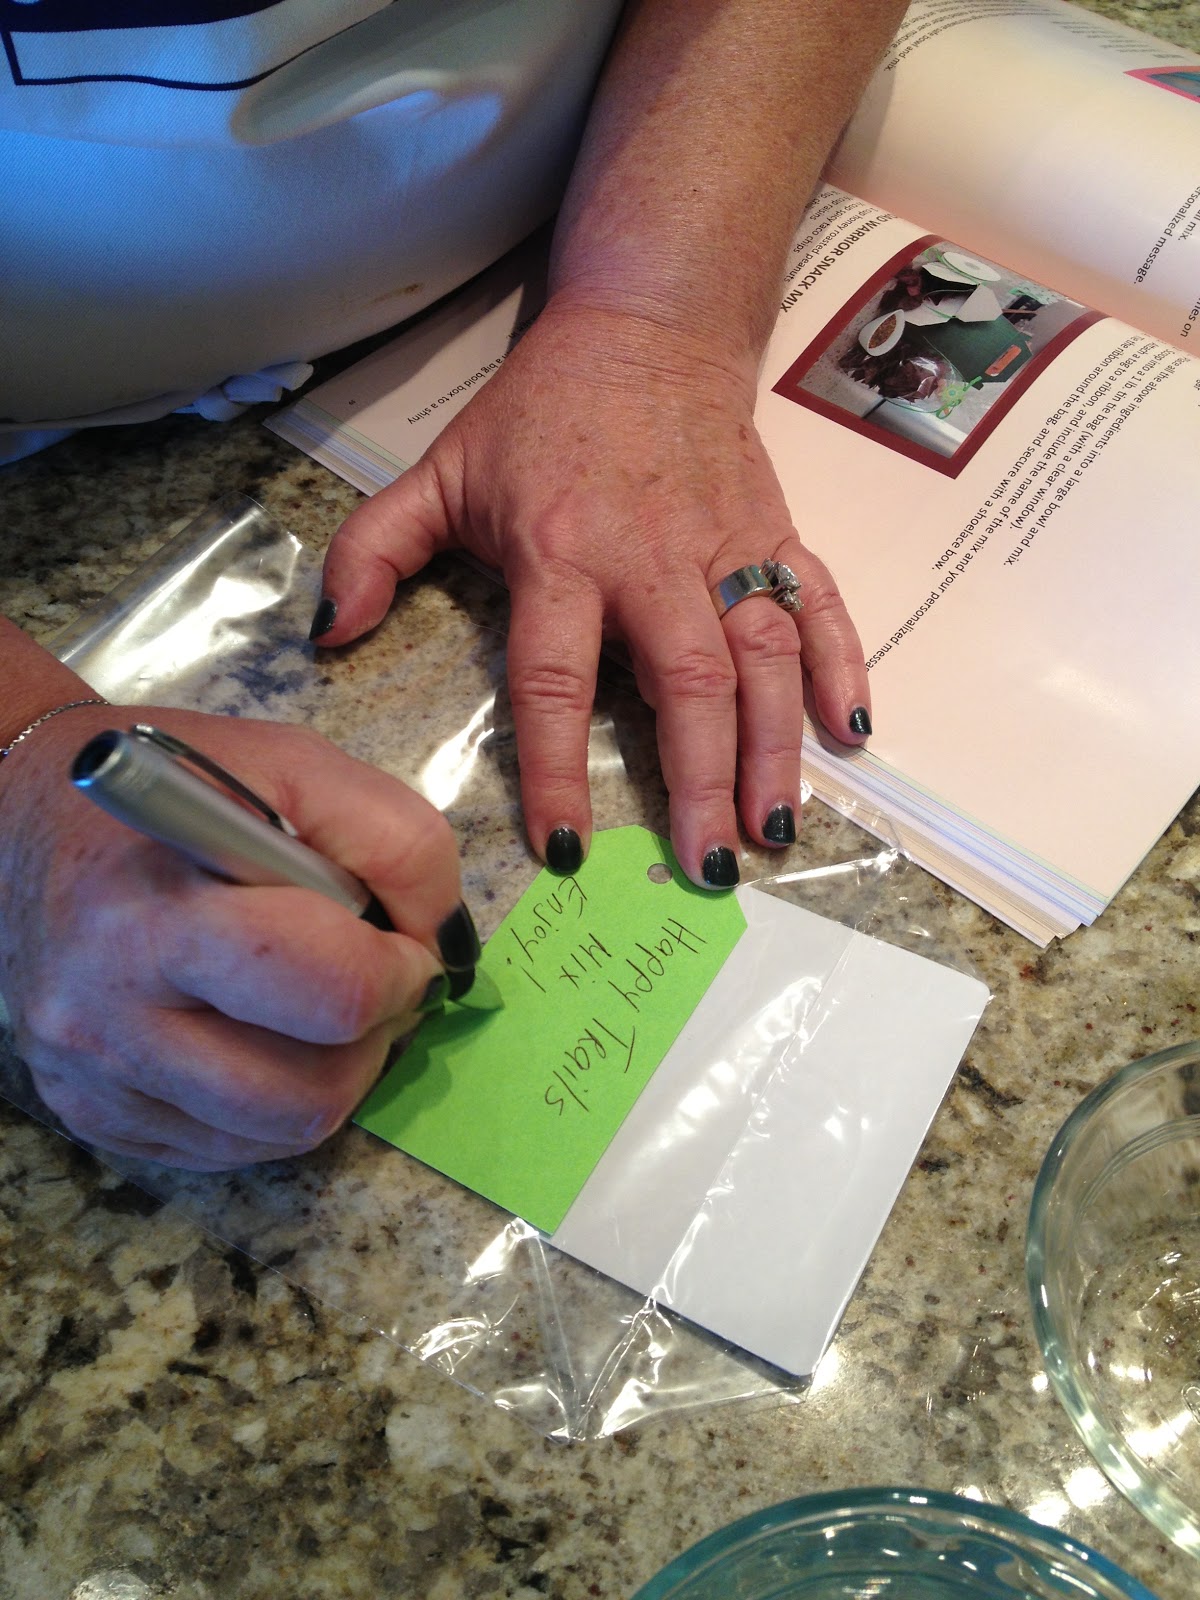
6. Attach your tag to the ribbon on your bag.
DIY Christmas Wreath

Tis the season for holiday shopping. I thought it was time to update my wreath on my door, so off to the mall I went. After the 4th store I went into and saw the really expensive door wreath I decided a) I can make this myself and b) I can do this for way less than the ones I saw at the store. Plus lets be real I love a fun DIY project, this took me a few hours and I loved the way it turned out so much I made two.
Materials Used:
- Wreath used is a 28”.
- Ribbon used is 35 ft. or ½ roll of Mesh Ribbon
- I used apple picks but you can use any of our cute picks.
Directions:
- Wind 4” mesh ribbon around wreath connecting the ribbon on the wire branches every 6 Inches, while you loop the ribbon around the wreath.
- Place 12 apple picks or 12 of any other decoration you wish around the wreath and fluff until you are happy.


DIY Cupcake gifts
With the Holidays around the corner I am on the hunt for easy DIYs to give as gifts. I have been obsessed with Soda pop cupcakes (directions on the blog) I have made the cupcakes a TON lately and every time people have asked for my recipe. So finally it clicked, what a perfect DIY that is less than a dollar and super cute.

First the supplies needed:
Boxed cake mix
Cans of pop
Tags http://www.creativepackaging.ca/collections/accessories-specialty-items?page=5
Ribbon http://www.creativepackaging.ca/collections/ribbon
Cardboard bottom bags in 2 sizes I used 4x8 and 6x12 http://www.creativepackaging.ca/collections/confectionary-bags
Directions:
 1.Measure 1/2 of the boxed cake mix into the smaller cardboard bottom bag.
 2. Tie it up
 3. Put a can of soda and the cake mix in the larger cardboard bottom bag.
 4. Add the directions on the tag (I just 1/2 the directions from our blog http://www.creativepackaging.ca/blogs/creative-crafts) tie with a ribbon and tada!!!
I used 1/2 the box so it goes twice as far, you can also add topping or filling for your cupcakes and get as fancy as you want. I wanted to keep it simple and keep my cost down. I hope you make and love the cupcakes as much as I do.
Soda Pop Cupcakes
- 1 box cake mix, any flavor (I have also done this with gluten free mix)
- 1 can (12 oz) of room temperature soda, any flavor
- Preheat your oven to 350°
- Line muffin pan with liners.
- In a medium bowl combine your pop and cake mix, stirring with a whisk until most of the lumps are gone.
- Fill each liner 1/2 full of batter.
- Bake for 18-20 minutes until cupcakes are springy and toothpicks comes out clean.
- Let cool completely before frosting.

Wedding Ideas & Brides
Don't know what you want to do for your wedding favors? Come in and see our extensive wedding display and get some ideas. You'll find stunning samples, done up in a rainbow of ribbon colors. We'll be happy to do a sample for you in your wedding colors and teach you how to tie up your bows like an expert.
ARTICLE - Beautiful Brides Chair
Wedding Favor Boxes We have a fabulous selection of miniature boxes to showcase your wedding favors. You'll find all kinds of shapes and sizes, tiny cube boxes, elegant truffle boxes, Chinese take-outs, frosted boxes, and so much more! Add some ribbon - glamorous or funky - and get the perfect look for your wedding.
Need some favor ideas? Click here for a few suggestions
Wedding Favor Bags
If your wedding favors are best presented in a small bag then check out our many styles of organza bags. We offer a variety of colors, sizes, and great prices. We also have paper, glassine, velvet and pvc bags.

Confectionary Bags
Our basket bags are extremely popular with brides. Choose from our great selection of sizes - from tiny bags to large Cello bags are easy to use and very economical. Their crisp, shiny look creates a beautiful presentation for your favors. Whether you want a clear bag, a printed bag, or a cardboard bottom bag, we have all of them reasonably priced!
Tip: Talk to our experts about the look you want.

Creative Packaging, A113-2099 Lougheed Highway, Port Coquitlam, BC V3B 1A8
© 2026 Creative Packaging (Canada)

